UIKit as a Base Layer, SwiftUI as a Design Layer
14 min readThis article is a tutorial (and rationale) for implementing the Coordinator architecture using a combination of UIKit (base layer) and SwiftUI (view layer)
Preamble
I am in the early stages of building an iOS app that I plan on supporting for many years into the future. I need an architecture that is reliable, battle-tested, and supports deeplinking (a button press or notification tap might launch into a screen that requires multiple navigation steps), while also giving me the ability to rapidly iterate on my UI. The architecture I’ve landed on combines both UIKit and SwiftUI, so I can take advantage of their individual strengths.
Over the last few years SwiftUI has evolved and matured. It is production-ready and used by lots of large companies. However, UIKit still has many advantages and compelling reasons why it’s not worth abandoning entirely.
UIKit is imperative - you tell the system exactly what to do, and how to get there. SwiftUI is declarative - you tell the system what you need, and it figures out how to get there. For an app with a complex data layer, and dozens of screens and states to manage, I prefer the clearly defined and well-validated architecture patterns that UIKit provides. SwiftUI’s main advantage (rapid UI development) can be focused on individual screens and components.
A Quick Side Note
In 2026, if you’re starting a brand new app and plan to forsake SwiftUI entirely, that’s likely a bad move. Despite my personal qualms (I still prefer the full control offered by UIKit), SwiftUI is the future of Apple platforms, it’s where they are headed. And it does offer excellent support to use one codebase across all platforms (iOS, iPadOS, watchOS, tvOS, macOS, and visionOS). Also the speed increase in development offered by SwiftUI makes it difficult to go back to writing custom NSLayoutConstraints and copying hundreds of lines of boilerplate just to render a basic table/collection view.
That said, SwiftUI isn’t without tradeoffs. If you aren’t careful, the performance “out of the box” can be sub-par. SwiftUI’s view diffing algorithm is opaque, it’s not always obvious how granularly you need to modularize your view hierarchy to prevent a state change in one component from triggering unnecessary redraws across the tree.
However, the only real argument for sticking solely to UIKit is when you are building something with highly custom rendering needs such as a spreadsheet engine handling millions of cells (commonly cited example, not something I’ve built personally), or an app focused around custom audio/visual rendering. For the majority of apps it makes more sense to take advantage of SwiftUI for rapid UI development and drop down to UIKit only when you genuinely need control beyond what SwiftUI surfaces. That need is diminishing with each release and UIViewRepresentable and UIViewControllerRepresentable make the bridge straightforward.
The Coordinator Pattern
Okay so how do you actually go about using UIKit as a base layer, and using SwiftUI for rendering your screens? I will describe the Coordinator architecture here that I’ve landed on, and walk you through setting up the Coordinator object itself, the UINavigationController, a UITabBarController, and how to present each screen in your app as a UIHostingController wrapper around a SwiftUI View.
For starters, when selecting new project in Xcode I specifically picked “UIKit” (Storyboards) and launch this entire process from the SceneDelegate. I do not use storyboards/XIBs in any capacity, and in fact I deleted the Main.storyboard, my app and UI are entirely programmatic.
1: Setting up the Coordinators
The first step is to define a Coordinator protocol. Every coordinator in the app will conform to this. The coordinator holds a reference to a UINavigationController, manages child coordinators, and includes a re-entrancy guard to prevent quick double-taps from presenting the same screen twice.
protocol Coordinator: AnyObject {
    var childCoordinators: [Coordinator] { get set }
    var navigationController: UINavigationController! { get set }
    var isNavigating: Bool { get set }
    func start()
}

extension Coordinator {
    func addChild(_ coordinator: Coordinator) {
        childCoordinators.append(coordinator)
    }

    func removeChild(_ coordinator: Coordinator) {
        childCoordinators.removeAll { $0 === coordinator }
    }

    func navigateGuarded(unlockAfter: TimeInterval = 0.5, action: () -> Void) {
        guard !isNavigating else { return }
        isNavigating = true
        action()
        DispatchQueue.main.asyncAfter(deadline: .now() + unlockAfter) { [weak self] in
            self?.isNavigating = false
        }
    }
}
The navigateGuarded() is a small but important detail, it sets a flag before performing a navigation action and unlocks it after a short delay. Without this, a user double-tapping a button quickly enough could push or present the same screen twice before the first transition finishes. This small time-based delay (0.5s) is an industry standard, and it works well enough. This basically just ensures accidental spam-clicks won’t launch the same screen twice.
Next, create the root AppCoordinator. This is the top of the coordinator/app hierarchy. It owns the primary UIWindow and decides what to show first, such as launching Onboarding for a new user, or loading the main app for every other launch. This primary Coordinator also handles app-wide modal presentations, such as a Settings screen.
final class AppCoordinator: Coordinator {
    var childCoordinators: [Coordinator] = []
    var navigationController: UINavigationController!
    var isNavigating: Bool = false

    private let window: UIWindow

    init(window: UIWindow) {
        self.window = window
    }

    func start() {
        if LocalStorage.shared.shouldShowOnboarding() {
            showOnboarding()
        } else {
            showMainApp()
        }
        window.makeKeyAndVisible()
    }

    private func showOnboarding() {
        let onboardingView = OnboardingView { [weak self] in
            LocalStorage.shared.setOnboardingStatus(isComplete: true)
            self?.showMainApp()
        }
        window.rootViewController = UIHostingController(rootView: onboardingView)
    }

    private func showMainApp() {
        let tabCoordinator = MainTabCoordinator()
        tabCoordinator.appCoordinator = self
        addChild(tabCoordinator)
        tabCoordinator.start()
        window.rootViewController = tabCoordinator.tabBarController
    }
}
Notice that SwiftUI views never know about coordinators directly. The OnboardingView receives a closure, when the user finishes onboarding this closure is called and the AppCoordinator then handles the transition to the main app by switching the window’s root view controller. Using closures in this way allows SwiftUI screens to trigger navigation as needed, without the UI code needing knowledge of the navigation tree.
2: Launching the Coordinators from App Entry
Now that we have the primary coordinator setup, we need to launch it during the app’s entry point. The SceneDelegate handles this for us, it creates the primary UIWindow, passes it to the AppCoordinator and then calls start():
class SceneDelegate: UIResponder, UIWindowSceneDelegate {
    var window: UIWindow?
    private var appCoordinator: AppCoordinator?

    func scene(
        _ scene: UIScene,
        willConnectTo session: UISceneSession,
        options connectionOptions: UIScene.ConnectionOptions
    ) {
        guard let windowScene = (scene as? UIWindowScene) else { return }

        let window = UIWindow(windowScene: windowScene)
        self.window = window

        let coordinator = AppCoordinator(window: window)
        self.appCoordinator = coordinator
        coordinator.start()
    }
}
Specifically, these 3 lines kickstart the entire process:
let coordinator = AppCoordinator(window: window)
self.appCoordinator = coordinator
coordinator.start()
To recap the flow so far, the SceneDelegate creates the window, creates the primary coordinator, and then starts it. From this point forward, all navigation decisions will flow through the coordinator hierarchy. The AppCoordinator will decide whether to show onboarding or the main tab-bar app. When we are launching the main app (not onboarding) the AppCoordinator will create a MainTabCoordinator as a child and start it. This tab bar child coordinator will in turn create a new coordinator for each tab, each of these “primary tab bar screens” coordinators will create its own UINavigationController so each screen/coordinator can present additional views as needed.
3: Building Navigation + Tab Bar Controllers
Each coordinator (representing a screen) gets its own UINavigationController. In this example I am using a small subclass to allow for custom styling/configuration to your app’s nav bar as needed:
final class NavigationController: UINavigationController {
    init(rootViewController: UIViewController, isNavBarHidden: Bool) {
        super.init(rootViewController: rootViewController)
        self.isNavigationBarHidden = isNavBarHidden

        let appearance = UINavigationBarAppearance()
        appearance.configureWithTransparentBackground()
        appearance.shadowImage = UIImage()
        navigationBar.standardAppearance = appearance
        navigationBar.scrollEdgeAppearance = appearance
        navigationBar.tintColor = .label
    }

    required init?(coder aDecoder: NSCoder) {
        fatalError("init(coder:) has not been implemented")
    }
}
For the tab bar itself (the primary layout of the app), a custom UITabBarController subclass is used to allow for custom styling/configuration as needed. This also exposes a method called loadTabs() where we pass in the navigation controllers for each child coordinator from the MainTabCoordinator. In this example I have 3 tabs hardcoded, this is easily modifiable if you need this to be more dynamic:
final class PrimaryTabController: UITabBarController {
    func loadTabs(
        homeNav: UINavigationController,
        exploreNav: UINavigationController,
        profileNav: UINavigationController
    ) {
        homeNav.tabBarItem = UITabBarItem(
            title: "Home",
            image: UIImage(systemName: "house"),
            tag: 0
        )
        exploreNav.tabBarItem = UITabBarItem(
            title: "Explore",
            image: UIImage(systemName: "safari"),
            tag: 1
        )
        profileNav.tabBarItem = UITabBarItem(
            title: "Profile",
            image: UIImage(systemName: "person.fill"),
            tag: 2
        )

        viewControllers = [homeNav, exploreNav, profileNav]
        tabBar.tintColor = .label
    }
}
The MainTabCoordinator ties all of this together. It creates a new child coordinator for each tab, wires up their callbacks to support app-wide actions (such as opening a Settings modal from anywhere in the app), and then feeds each navigation controller into the tab bar (the UITabBarController):
final class MainTabCoordinator: Coordinator {
    var childCoordinators: [Coordinator] = []
    var navigationController: UINavigationController!
    var isNavigating: Bool = false

    weak var appCoordinator: AppCoordinator?
    let tabBarController = PrimaryTabController()

    func start() {
        let homeCoordinator = HomeCoordinator()
        let exploreCoordinator = ExploreCoordinator()
        let profileCoordinator = ProfileCoordinator()

        // Wire app-wide actions back up to the AppCoordinator
        homeCoordinator.onSettingsTapped = { [weak self] in
            self?.appCoordinator?.presentSettings(
                from: homeCoordinator.navigationController
            )
        }
        // ... same wiring for other coordinators

        addChild(homeCoordinator)
        addChild(exploreCoordinator)
        addChild(profileCoordinator)

        homeCoordinator.start()
        exploreCoordinator.start()
        profileCoordinator.start()

        tabBarController.loadTabs(
            homeNav: homeCoordinator.navigationController,
            exploreNav: exploreCoordinator.navigationController,
            profileNav: profileCoordinator.navigationController
        )
    }
}
The callback pattern here is important. Our SwiftUI screens don’t know about the tab coordinator or the app coordinator, they simply call a closure such as onSettingsTapped?(). The tab coordinator then catches this closure and delegates it to the app coordinator, which actually performs the modal presentation. This keeps each layer distinctly focused on its own responsibilities.
4: Displaying SwiftUI Screens
Now we get to presenting/working with individual screens in the app. An individual coordinator in the tab coordinator creates a SwiftUI view and wraps it in a UIHostingController. This controller is then set as the root view of the UINavigationController for this coordinator, so you can present additional screens from it if needed.
final class HomeCoordinator: Coordinator {
    var navigationController: UINavigationController!
    var childCoordinators: [Coordinator] = []
    var isNavigating: Bool = false

    var onSettingsTapped: (() -> Void)?

    func start() {
        let homeView = HomeScreen(
            onSettingsTapped: { [weak self] in
                self?.onSettingsTapped?()
            },
            onItemSelected: { [weak self] item in
                self?.showDetail(for: item)
            }
        )

        let hostingController = UIHostingController(rootView: homeView)
        hostingController.title = "Home"

        navigationController = NavigationController(
            rootViewController: hostingController,
            isNavBarHidden: false
        )
    }

    private func showDetail(for item: Item) {
        let detailView = ItemDetailScreen(item: item)
        let hostingController = UIHostingController(rootView: detailView)
        navigationController.pushViewController(hostingController, animated: true)
    }
}
Now on the SwiftUI side, this screen is a completely standard view with no UIKit imports needed and no references needed to the coordinators. In order to perform navigation, such as opening Settings, launching a modal, or navigating to a details screen, this view can call a simple closure, it has no opinion or knowledge of the app’s navigation hierarchy:
struct HomeScreen: View {
    var onSettingsTapped: (() -> Void)?
    var onItemSelected: ((Item) -> Void)?

    var body: some View {
        List(items) { item in
            Button {
                onItemSelected?(item)
            } label: {
                ItemRow(item: item)
            }
        }
        .toolbar {
            ToolbarItem(placement: .topBarTrailing) {
                Button {
                    onSettingsTapped?()
                } label: {
                    Image(systemName: "gearshape.fill")
                }
            }
        }
    }
}
With this you have a comprehensive navigation pattern in place that can be extended to build a full app, while allowing SwiftUI to play to its strength (fast and easy UI iteration). The individual SwiftUI views are simple, testable, and have zero knowledge of the navigation layer. The coordinator decides what to show and how to transition. SwiftUI decides what it looks like.
5: Presenting Views, Modals, and Deep Linking
With the coordinator layer in place, every type of navigation becomes a method call on the appropriate coordinator. Here are the three most common patterns:
Pushing onto the navigation stack: this is the default presentation method, useful for launching into secondary full screens with a back button on the nav bar. The coordinator creates and wraps a new SwiftUI view in a UIHostingController and pushes it:
func showDetail(for item: Item) {
    let detailView = ItemDetailScreen(item: item)
    let hostingController = UIHostingController(rootView: detailView)
    navigationController.pushViewController(hostingController, animated: true)
}
Presenting a modal: this uses present() on the current view controller to present a modal as needed. You can configure sheet detents for a half-sheet, or present a full screen modal:
func presentSettings(from viewController: UIViewController) {
    navigateGuarded {
        let settingsView = SettingsScreen()
        let hostingController = UIHostingController(rootView: settingsView)

        // Half-sheet style
        if let sheet = hostingController.sheetPresentationController {
            sheet.detents = [.medium(), .large()]
            sheet.prefersGrabberVisible = true
        }

        viewController.present(hostingController, animated: true)
    }
}
Deep linking: the final missing piece of our navigation stack (presenting, pushing, and now deep linking). This is where our coordinator architecture really excels. Because coordinators are imperative, you can programmatically navigate multiple levels deep in a single method easily. There is no need to manage complex NavigationPath states or worry about SwiftUI’s declarative timing. For instance, say a push notification needs to open up to a specific item detail screen nested inside the Home tab:
// In AppCoordinator
func handleDeepLink(_ deepLink: DeepLink) {
    // 1. Only create a new tab coordinator if one doesn't already exist
    if childCoordinators.compactMap({ $0 as? MainTabCoordinator }).first == nil {
        showMainApp()
    }

    guard let tabCoordinator = childCoordinators
        .compactMap({ $0 as? MainTabCoordinator }).first else { return }

    switch deepLink {
    case .itemDetail(let itemID):
        // 2. Switch to the correct tab
        tabCoordinator.tabBarController.selectedIndex = 0

        // 3. Pop to root so we start from a clean state
        let homeCoordinator = tabCoordinator.childCoordinators
            .compactMap { $0 as? HomeCoordinator }.first
        homeCoordinator?.navigationController.popToRootViewController(animated: false)

        // 4. Push directly to the detail screen
        homeCoordinator?.showDetail(for: itemID)

    case .settings:
        // Deep link to a modal — present from whichever tab is active
        let activeNav = tabCoordinator.tabBarController.selectedViewController
            as? UINavigationController
        if let activeNav {
            presentSettings(from: activeNav)
        }
    }
}
In the case of deeplinking, the coordinator works through the hierarchy in top-down order:
- Ensure the right root is showing
- Switch to the correct tab
- Clear any stale navigation state
- Push or present the target screen
Each step is a single imperative call. Compared to SwiftUI’s declarative navigation where you’d need to coordinate state changes across NavigationPath bindings, tab selection bindings, and modal presentation bindings, the Coordinator architecture guarantees the correct execution order because you fully control it.
A Quick Note on Memory Leaks
If you present or push a coordinator onto another coordinator via addChild, you must call removeChild when it’s dismissed to avoid a memory leak (ensure the coordinator is truly deleted upon dismissal and is properly removed from childCoordinators array).
In the example code above (in section #5), the Settings modal is a simple UIHostingController (it does not have its own coordinator), so we don’t need to worry about this (in that example, there’s no additional child coordinator to remove). However, in a real app, a Settings screen/modal likely does have its own coordinator, since it will have multiple sub-screens you can click into. Below is an example of how to properly remove a child coordinator for a true production-ready implementation of our coordinator pattern:
// Only needed when a modal flow has its own coordinator:
let settingsCoordinator = SettingsCoordinator()
addChild(settingsCoordinator)
settingsCoordinator.start()

// The coordinator passes itself when it finishes,
// so the parent can clean up without a retain cycle:
settingsCoordinator.onFinished = { [weak self] coordinator in
    self?.removeChild(coordinator)
}

// Inside SettingsCoordinator:
var onFinished: ((Coordinator) -> Void)?

func dismiss() {
    onFinished?(self)
}
The code above captures the dismiss() event when the user taps the close button. Additionally, we need to implement/conform to the UIAdaptivePresentationControllerDelegate and trigger onFinished() via the presentationControllerDidDismiss function (since it’s a swipable-to-dismiss modal view). With this, both the dismiss button and swipe-to-dismiss events will be caught and ensure this coordinator is removed from memory upon dismissal:
// Make your coordinator (or a small helper) the presentation delegate:
extension SettingsCoordinator: UIAdaptivePresentationControllerDelegate {
    func presentationControllerDidDismiss(
        _ presentationController: UIPresentationController
    ) {
        // The user swiped the modal away — clean up just
        // like we would on an explicit dismiss:
        onFinished?(self)
    }
}

// When presenting, wire up the delegate:
let hostingController = UIHostingController(rootView: settingsView)
hostingController.presentationController?.delegate = settingsCoordinator
parentViewController.present(hostingController, animated: true)
The UIAdaptivePresentationControllerDelegate and dismiss() functions outlined above handle the dismiss button and a modal swipe-to-dismiss. For the example codebase described in this tutorial, this handles all cases (modals). If you find yourself expanding this architecture and you want to push a view instead of presenting it, then you would need to handle a third case and implement the UINavigationControllerDelegate and listen for dismissal via methods available in this delegate. In this tutorial, this step is not necessary since all pushed (non-modal) view controllers live within the same navigation stack / coordinator.
Quick tip since I often mix up these two similar sounding terms:
- Push: Add a new view controller onto the top of a navigation stack (default behavior = new screen with a system back button)
- Present: Display a new view controller (modally) outside of the navigation stack (used in this tutorial, top-right close button or swipe to dismiss popup screen)
The Data Layer
Now that the app’s architecture is laid out, a quick note on the data layer and how you handle passing object references through the stack. In a pure SwiftUI app you’d typically define a shared data object as an @EnvironmentObject at the root of your view hierarchy and let it propagate down. With coordinators, you don’t have a SwiftUI view hierarchy, so instead the AppCoordinator owns the data layer, and passes it directly into each SwiftUI view at creation time:
let homeView = HomeScreen(appState: self.appState, ...)In the SwiftUI screen, the view stores this object as a regular property (or uses @Bindable if you need two-way binding). Since @Observable triggers SwiftUI re-renders automatically, the view is fully reactive, and the coordinator handles passing the dependency through.
When a user interacts with the UI, such as tapping a button, the SwiftUI view can either mutate the @Observable object directly (since it holds a reference to it), or call a closure back to the coordinator for actions that involve navigation or side effects. In practice, both are useful: direct mutation for pure data changes like toggling a setting or updating a form field, closures for anything that needs to leave the screen such as a “save and go back” button/action. This keeps the boundary clean, SwiftUI handles state, UIKit coordinators handle flow.
I kept this section short since this tutorial is focused on the coordinator pattern, and implementing the data layer would distract from this (already complex) subject matter. In the example codebase available via link at the bottom of this post, I included examples of both data patterns (direct mutation, and closure based updates).
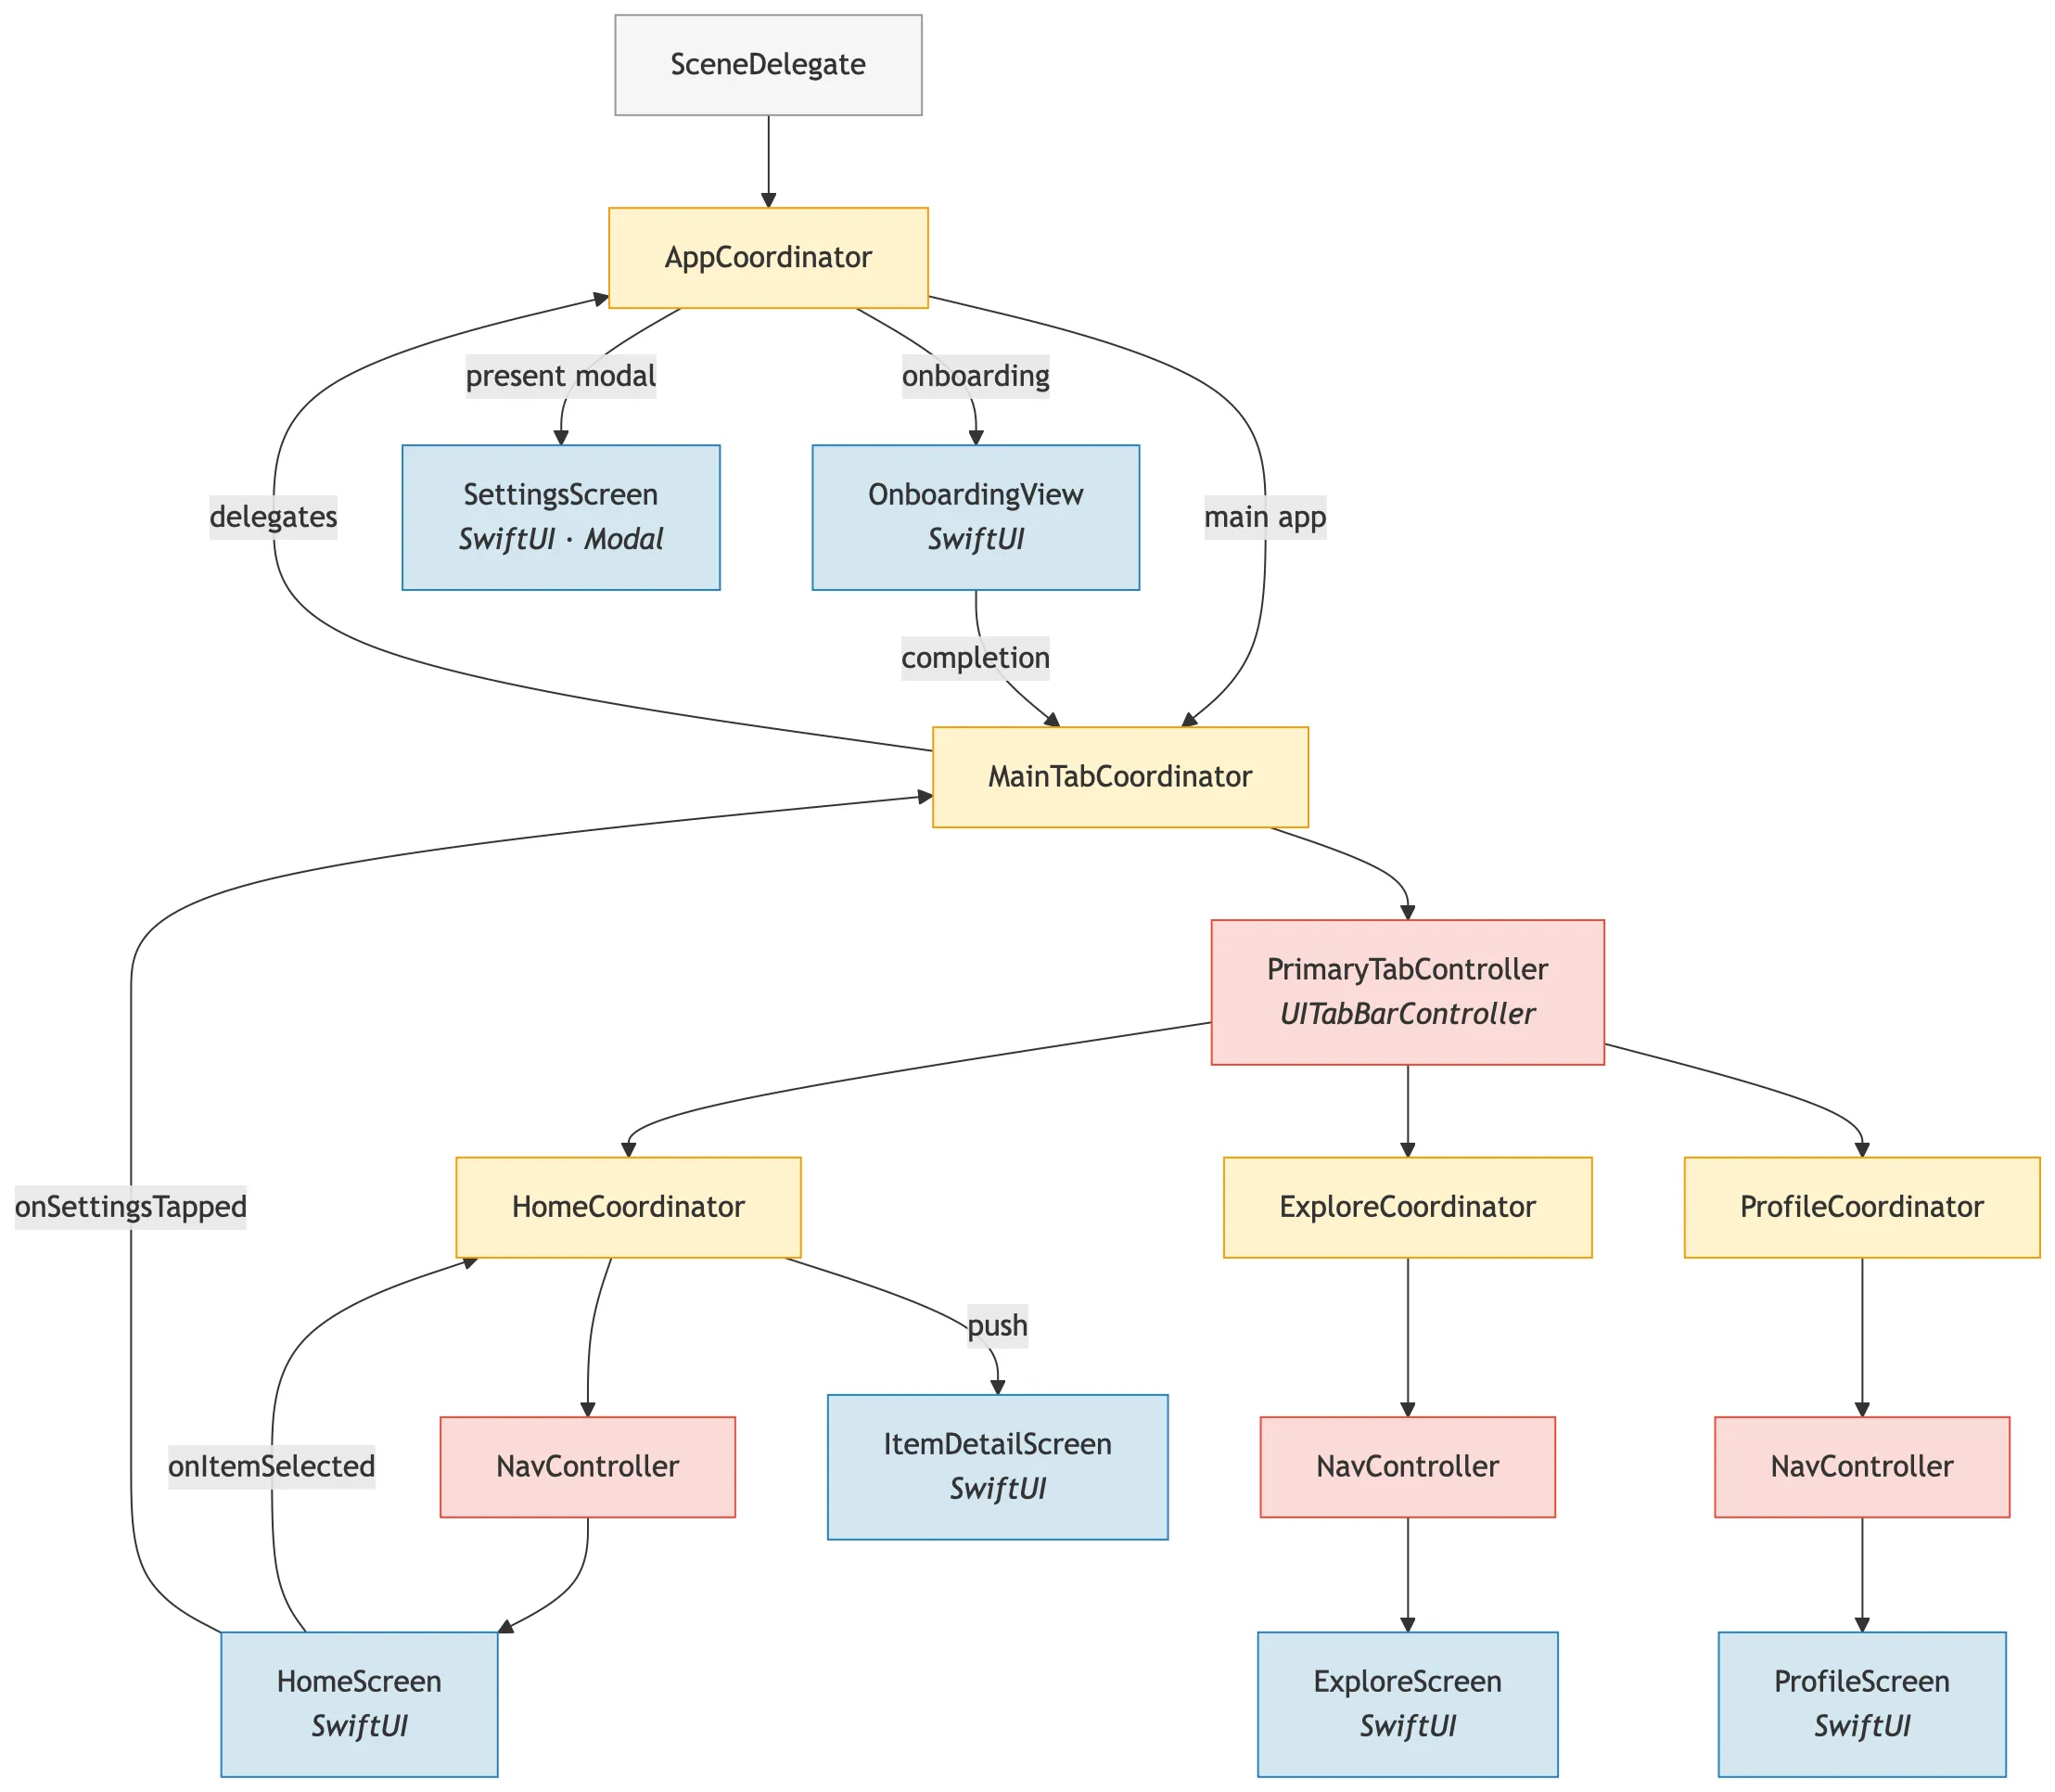
Architecture Diagram
Just for fun I had Claude Opus 4.6 read this blog post and then convert it into a mermaid architecture diagram. Some of the screens are extrapolated (described but not explicitly shown). Hopefully this helps you wrap your head around how the navigation flow looks with coordinators!
Conclusion
And there you have it! This architecture pattern lets you delegate all of the navigation to a UIKit-based Coordinator layer, and lets SwiftUI shine as a focused, self-contained UI layer.
In a typical SwiftUI app where you are trying to combine all of this together, screens/views can quickly become bloated. Using this approach you can maintain clear separation, and keep all navigation firmly outside of your UI components, allowing for easy, focused component design, and letting navigation be an imperative and easy to follow flow.
The full example project with working code for everything covered in this post (including both data layer patterns) is available here: iOS-Coordinator-Architecture on GitHub
Thanks for reading!
Gavin